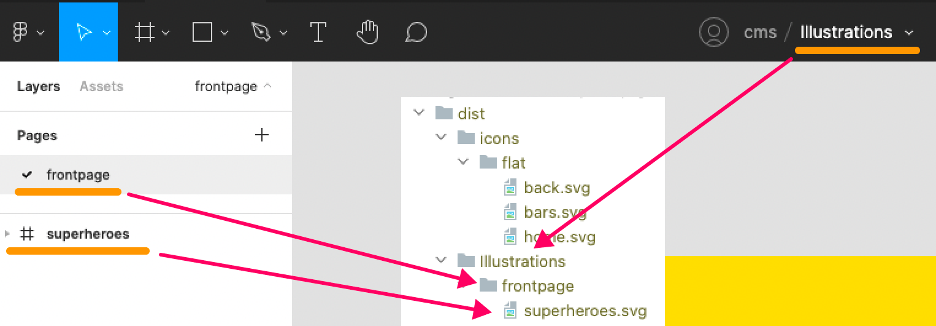
Although Figma is mostly used by designers, we tried using it in the development process, by transforming Figma into a CMS.
Managing graphical assets in a large project can be tedious and costly, consuming lots of storage space and time. Web-based design tool; Figma, offers a great solution, if we leverage their API wisely.
Last year, software design company Figma saw its valuation multiply by five(!) to $10 billion. Although this tool is mostly used by designers, we tried using Figma in the development process of our solutions. More specifically, we used Figma as a visual CMS for our own applications. Below you will find a guide on how it’s done.
Before diving into the technical matters, let’s start off by interpreting Figma’s valuation explosion. Why should you use it?
- As Figma grows in the industry, it has become the design tool we see the most when receiving visual- and/or interaction-design and in terms of icon library management.
- Because it’s free of charge and quick usage, because it is cloud-based and available from any device or location.
- Figma has an expansive API covering, from CRUD actions on files to webhooks for getting notified on updated files.
- Figma eases the hand-off from designer to developer.
How would we like to use Figma?
How do you manage visual assets in a growing web project? The handover between designer and developer can be quite jarring, especially with third parties coming in-between. Naturally, most of these assets nowadays are stored in a content management system (CMS), which makes editing and publishing graphical assets super easy. A CMS typically allows you to manage text-based content and link media assets. But recently we needed our editors to manage complex graphics. Our solution: Figma as a headless CMS.
Check out the video above to see what we mean with this. The design in Figma is changed and within just a few seconds, this new design is displayed on the whole website, without having to change each page individually. This way, we turned Figma into a CMS.
How do we go from Figma as a design tool to a CMS?
Avoiding going into detail on how to structure your projects and which technologies to use, I have tried to demonstrate some general use cases in a simple project. First, let me show you.
Let’s go through the video step by step;
- A Figma object is edited by moving and recolouring shapes;
- A new file version is released
- The webhook trigger is set for ‘file version update’, so work in progress does not get published. See this as the “publish” button in your CMS.
- Wait for the server to receive a request from the webhook and fire a build script; and
- See the changes in the browser.
Why it works
The Figma HTTP API has an export endpoint which temporarily saves an exported resource to their cloud storage (an AWS S3 Bucket at time of writing). We can use this temporary storage during our build process to fetch new graphical assets on every build and save them in the build cache, or even manage a resource cache of cloud storage links that update every so often. Because of the new webhooks from Figma, we can even trigger these builds on certain events, and the 'FILE_VERSION_UPDATE' event is perfect for this. Firing every time a new 'version' is released, giving full control of what and when gets updated.
We envisioned this to work well in a project that required lots and lots of different visual components, managed by different people in different locations. And it worked perfectly with Figma, and it’s API. The example is fairly simple, with a single illustration, but imagine for example managing maps of indoor spaces.
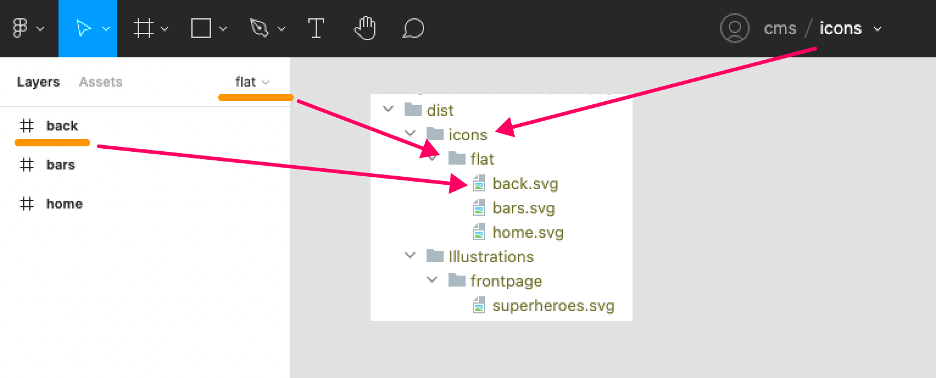
In this setup, Figma files are mapped to a static folder during build, according to the naming used in Figma.

You can already see the other Figma files show up in my file structure, icons. Naturally, managing an icon library in Figma and publishing on each new release is also a very useful way of leveraging their API. Again, you see the available data mapped to the export.

We can use these SVG’s to build an icon spritesheet for our application, which might look something like this:
Using the API
For the aforementioned examples, I built a function that exports SVG’s based on so called filekey's that Figma uses. Calling their /files endpoint as follows:
Note that a file version is not specified in this request. Latest file versions need to be managed on your server implementation to make sure that build triggers other than Figma do not interrupt the version release flow of the graphical assets.
function getResourcesByFileKey(fileKey, fileName = 'icons') {
    return fetch(`${FIGMA_BASE}/v1/files/${fileKey}?depth=2`, {
        headers: {
            'x-figma-token': X_FIGMA_TOKEN
        }
    }) // Fetches the file object by the fileKey
        .then(res => res.json())
        .then(res => res.document.children.map((child, i) => ({ // Create an array of the top-level frames
            page: child.name,
            nodes: child.children.map(child => ({
                name: child.name,
                id: child.id
            })),
            ...child
        })))
        .then(items => items.map(({page, nodes}) => [ // Use the node ID's of these frames to export them
            fsPromises.mkdir( // First ensure the folder to save it to
                path.resolve(
                    __dirname,
                    `../dist/${fileName}/${page}`),
                {recursive: true}
            ),
            nodes.map(
                node =>
                    fetch(`${FIGMA_BASE}/v1/images/${fileKey}?ids=${node.id}&format=svg&svg_include_id=true`,
                        {
                            headers: {
                                'x-figma-token': X_FIGMA_TOKEN
                            }
                        }) // Fetch every node
                        .then(res => res.json())
                        .then(res => res.images[node.id])
                        .then(async (resource) => {
                            console.log(`🦴Fetching '/${fileName}/${page}/${node.name}.svg'`)
                            return await fetch(resource).then(res => res.text())
                        })
                        .then(data => // Return a promise for the file writes
                            fsPromises.writeFile(
                                path.resolve(
                                    __dirname,
                                    `../dist/${fileName}/${page}/${node.name}.svg`),
                                data.replace(/fill=".*?"/, ''),
                                err => {
                                    if (err) {
                                        console.error(err)
                                    }
                                })
                        )
            )]))
}
We end up with an array containing the pages and their top level nodes for the file we gave it. The name of the top level node, usually a frame in Figma, will be the filename. Superheroes.svg in our example. We can then loop through the array and fetch SVG resources from their /images endpoint and save that to our filesystem.
Using the /projects endpoint, we can request all files within a project (for example a project named “CMS”) and subsequently call getResourceByFileKey() for every file we find in our project
async function getResourcesFromFigma() {
        const figmaFiles = await fetch(`${FIGMA_BASE}/v1/projects/${FIGMA_PROJECT}/files`, {
            headers: {
                'x-figma-token': X_FIGMA_TOKEN
            }
        })
            .then(res => res.json())
            .then(json => json.files)
        await Promise.all(figmaFiles.map(({key, name}) => module.exports.getResourcesByFileKey(key, name)).flat())
    }
To connect all the events to each other, we use Figma’s new webhooks. We register a new webhook on server startup
fetch(`${FIGMA_BASE}/v2/webhooks?team_id=${FIGMA_TEAM}&endpoint=${ENDPOINT}/figma/file_update&passcode=${passcode}&event_type=FILE_VERSION_UPDATE`)Figma will now POST to the endpoint you specified in the request with the corresponding fileKey for the updated file version. We can then call the aforementioned function again with the supplied fileKey (I am using a simple Fastify node server in this example)
fastify.post('/file_update', async (request, reply) => {
    if (request.body.passcode === passcode) {
        reply.code(200)
        const {file_name, file_key, timestamp} = request.body
        console.log(file_name, file_key, timestamp)
        if(file_name && file_key && timestamp) {
            await getResourcesByFileKey(file_key, file_name)
        }
    } else reply.code(403)
    reply.send()
})
Notice that I did not perform any error handling, this code is long as it is for demonstration purposes. Consider your own implementation!
Want to read more?
- We played around with using other tools as a CMS, like Dropbox Paper.
- Figma to Fullstack React App With Minimal Programming, using AWS Amplify Studio.
-
Figma CEO Dylan Field’s twitter account. Not only does he tweet about Figma and new features, but also about NFT’s, Web 3.0 and the metaverse.
