Here’s your chance to go from Zero Cool to Crash Override
We're going to use a set of command line tools to see how they can help a (front-end) developer. Most of the tools are cross-platform available and some of them are specific to MacOS.

TLDR
Simplified and community-driven man pages
📝 Source
👩💻 Installation: brew install tldr (other clients also available)
Suppose you need to copy a folder recursively. You forgot the arguments and need some quick and simple examples. Using the man page of cp with $ man cp will give you a very comprehensive page without any examples. A search on the internet also takes some time. Using tldr:
$ tldr cpOutputs:
cp

  Copy files and folders.

  - Copy a file to another location:
    cp path/to/file.ext path/to/copy.ext

  - Copy a file into another folder, keeping the filename:
    cp path/to/file.ext path/to/target/parent/folder

  - Copy a folder recursively to another location:
    cp -r path/to/folder path/to/copy

  - Copy a folder recursively into another folder, keeping the folder name:
    cp -r path/to/folder path/to/target/parent/folder

  - Copy a folder recursively, in verbose mode (shows files as they are copied):
    cp -vr path/to/folder path/to/copy

  - Copy the contents of a folder into another folder:
    cp -r path/to/source/folder/* path/to/target/folder

  - Copy text files to another location, in interactive mode (prompts user before overwriting):
    cp -i *.txt path/to/source/
You can use tldr with all of the tools below, for extra comprehension!
Z
Jump to your most used directories
📝 Source
👩💻 Installation:
$ brew install z- Add
. /usr/local/etc/profile.d/z.shto your.bash_profilefor Bash and runsource .bash_profileto reload all your settings in this file. - Cd into some directories. Z will now track your used directories based on recency and frequency and gives each directory a ranking.
The most commonly used task in a terminal would probably be going to specific folders. Luckily with z you can go to a folder instantly. It tracks your most used directory and gives each a ranking. The more you visit a folder, the higher the ranking.
Show all the rankings of directories that z has tracked so far:
$ zTo go to the folder ~/Documents/examples/someProjectA/:
$ z projectaIf you want to go to a /src folder in one of your projects you can do:
$ z projecta srcHTTPie
A CLI, cURL-like tool for humans
📝 Source
👩💻 Installation: $ brew install httpie (other clients available)
HTTPie is an HTTP client which goal is to make CLI interaction with web services as human-friendly as possible. It can be used or testing, debugging, and generally interacting with HTTP servers. It's so powerful that replacing cURL for HTTPie is an obvious choice.
$ http http://httpbin.org/headersOutputs:
HTTP/1.1 200 OK
Access-Control-Allow-Credentials: true
Access-Control-Allow-Origin: *
Connection: keep-alive
Content-Length: 175
Content-Type: application/json
Date: Mon, 09 Apr 2018 08:54:00 GMT
Server: meinheld/0.6.1
Via: 1.1 vegur
X-Powered-By: Flask
X-Processed-Time: 0

{
    "headers": {
        "Accept": "*/*",
        "Accept-Encoding": "gzip, deflate",
        "Connection": "close",
        "Host": "httpbin.org",
        "User-Agent": "HTTPie/0.9.9"
    }
}
This simple example doesn't do any justice of what HTTPie can do. Checkout the docs for a comprehensive writeup of all the possibilities.
jq
JSON processor
📝 Source
👩💻 Installation: brew install jq (other clients available)
With jq you can slice, filter, map and transform structured data with ease.
We're going to use HTTPie to make a request to the JSON Placeholder API. The output from the http command will be send to the jq command with the pipe symbol (|). Here jq is used with the expression ., which takes the input and outputs it unchanged. This shows a list of 10 users:
$ http https://jsonplaceholder.typicode.com/users | jq '.'To get the first user:
$ http https://jsonplaceholder.typicode.com/users | jq '.[0]'Outputs:
{
  "id": 1,
  "name": "Leanne Graham",
  "username": "Bret",
  "email": "[email protected]",
  "address": {
    "street": "Kulas Light",
    "suite": "Apt. 556",
    "city": "Gwenborough",
    "zipcode": "92998-3874",
    "geo": {
      "lat": "-37.3159",
      "lng": "81.1496"
    }
  },
  "phone": "1-770-736-8031 x56442",
  "website": "hildegard.org",
  "company": {
    "name": "Romaguera-Crona",
    "catchPhrase": "Multi-layered client-server neural-net",
    "bs": "harness real-time e-markets"
  }
}
To get the latitude coordinate:
$ http https://jsonplaceholder.typicode.com/users | jq '.[0] .address.geo.lat'Outputs:
"-37.3159"To get the username, email and company name in a custom object:
$ http https://jsonplaceholder.typicode.com/users | jq '.[0] | {username: .username, email: .email, company: .company.name}'Outputs:
{
  "username": "Bret",
  "email": "[email protected]",
  "company": "Romaguera-Crona"
}fzf
A command line fuzzy finder
📝 Source
👩💻 Installation: $ brew install fzf (other clients available)
fzf is a fast and powerful fuzzy finder. It's an interactive Unix filter for command-line that can be used with any list; files, command history, processes, hostnames, bookmarks, git commits, etc.
Search in current directory for directory names and files:
$ fzfOutputs:
 549/549
> Dockerfile
  app.config.js
  dato.config.js
  docker/Mongo.Dockerfile
  docker/Proxy.Dockerfile
  docker/nginx.conf
  docker-compose.yml
  docs/deployment.md
  docs/environment.md
  docs/front-end-setup.md
  docs/front-end-tooling.md
  docs/i18n.md
  ...
By default fzf shows the total number of files and below all the files sorted alphabetically. The > is the prompt.
We're going to search in a directory _base for all .svg files that use a dash:
> _base - .svgOutputs:
5/549
sites/_base/public/images/mb-net.svg
sites/_base/public/icons/check-circle.svg
sites/_base/public/icons/shopping-bag.svg
sites/_base/public/icons/app-store-badge.svg
sites/_base/public/icons/google-play-badge.svg
Searching for > - .svg _base would return the same results.
Search in all git commits for the term "header":
$ git log | fzf -q "header"fzf needs an application that does the traversing of the file system. By default it uses the find command. The fd command is a fast alternative and has several advantages over find, including ignoring patterns from your .gitignore. To use fd:
$ brew install fd
$ export FZF_DEFAULT_COMMAND='fd --type f'
You can also save the export command to your .bash_profile and it will remember the setting.
By default, fzf search results show up at the top. You can reverse this as in the screenshots. Put in your .bash_profile to remember this option or execute it directly from the terminal:
export FZF_DEFAULT_OPTS='--reverse'The Silver Searcher
Lightning fast full text search
📝 Source
👩💻 Installation: brew install the_silver_searcher
When you need a very quick text search, opening up your Code Editor can take too long. Using the find command is awful, if that's not your thing. Using the Silver Searcher is simple and extremely fast. The command name is ag, which is the chemical symbol for silver (Ag). It also respects the entries in your .gitignore.
Searching for the text '</form>' recursively in all directories:
$ ag '</form>'Outputs:
sites/_base/components/product-filters/product-filters.js
61:   </form>

sites/_base/components/product-lens-tier/product-lens-tier.js
63:   </form>

sites/_base/components/search-form/search-form.js
40:  </form>
Search for the text '' recursively in all directories where the filenames must match 'search':
$ ag '</form>' -G searchOutputs:
sites/_base/components/search-form/search-form.js
40:  </form>
trash-cli
Move files and folders to the trash
📝 Source
👩💻 Installation: npm install --global trash-cli
In contrast to rm, which permanently deletes files, trash moves all files and folders to the trash. If you’re interested about how rm works and the dangers it brings with it: read more about rm.
Remove the folder build and all the files and folders containing it and move it to the trash:
$ trash buildnpx
Execute npm package
📝 Source
👩💻 Installation: npx is bundled with npm so there's no need to install it globally
npx is very convenient for one off execution commands. Say you want to quickly fire up a local server in a directory. You could use the npm package serve and install it globally, or locally and execute from ./node_modules/.bin/serve. Sounds tedious.
npx removes all the hassle:
$ npx serveThis will after a few moments serve up the current folder on localhost:5000.
With npx you can even execute a gist immediately (this will output yay gist):
$ npx https://gist.github.com/zkat/4bc19503fe9e9309e2bfaa2c58074d32JSON Server
Run a mock API from the command line
📝 Source
👩💻 Installation: npm install -g json-server or npx json-server
Sometimes you're writing frontend code that needs to consume data from an API which isn't ready yet. In this case you can mock your own API.
Create a db.json file:
{
  "posts": [
    { "id": 1, "title": "command line tools article", "author": "john doe" }
  ],
  "comments": [
    { "id": 1, "body": "nice", "postId": 1 }
  ],
  "profile": { "name": "john doe" }
}
Start JSON Server:
$ npx json-server --watch db.jsonNow if you go to http://localhost:5000/posts/1, you'll get:
{ "id": 1, "title": "command line tools article", "author": "john doe" }ngrok
SSH tunnel to your development machine
📝 Source
👩💻 Installation: brew cask install ngrok, npm install -g ngrokor download from https://ngrok.com/download
ngrok allows you to create secure tunnels to localhost and make it available through a secure URL. There are lots of use cases (also see ngrok.com):
- Public URLs for sending previews to clients.
- Public URLs for demoing your own machine.
- Public URLs for testing on mobile devices.
- Public URLs for building webhook integrations.
- Public URLs for SSH access to your Raspberry Pi.
- Public URLs exposing your local web server.
Your local web server running on port 5000:
$ ngrok http 5000Outputs:
Session Status                online
Session Expires               7 hours, 56 minutes
Version                       2.2.8
Region                        United States (us)
Web Interface                 http://127.0.0.1:4040
Forwarding                    http://0a629ef8.ngrok.io -> localhost:5000
Forwarding                    https://0a629ef8.ngrok.io -> localhost:5000
The development server at port 5000 is now available at http(s)://0a629ef8.ngrok.io, including a web interface. The amount of connections to your ngrok URL is limited, but there are paid tiers that open up a lot of possibilities.
git-standup
Review yesterday’s commits
📝 Source
👩💻 Installation: brew install git-standup
When it's time for a standup and it's a bit of a blur what you did on your last working day, git-standup can save your day. To quickly generate an overview of what you did yesterday:
$ git standupOutputs:
ea2483c - fix(cookie-notification): added site container (10 days ago) <John Doe>
8a1dc1e - (fix/full-width-background) refactor: moved site container into the image gallery component to fix issues (11 days ago) <John Doe>
2f64d57 - (origin/fix/full-width-background) refactor: added site container to the breadcrumb on the product detail page (11 days ago) <John Doe>
To check what you did 3 days ago:
$ git standup -d 3Using the same command in a directory with multiple repositories will show you the commits of multiple projects. This will list all your commits since the last working day in all the repositories inside.
caffeinate
Never sleep
"Mac only"
On certain moments, you don't want your Mac to go to sleep. E.g. when you give a presentation or copy a large file:
$ caffeinateThis command will indefinitely be active, until you press CTRL+C.
To prevent your Mac from sleeping for one hour (3,600 seconds):
$ caffeinate -u -t 3600To prevent your Mac from sleeping until the copy command completes:
$ caffeinate -s cp src/largefile destination/largefileexa
LS, but with colors
📝 Source
👩💻 Installation: brew install exa
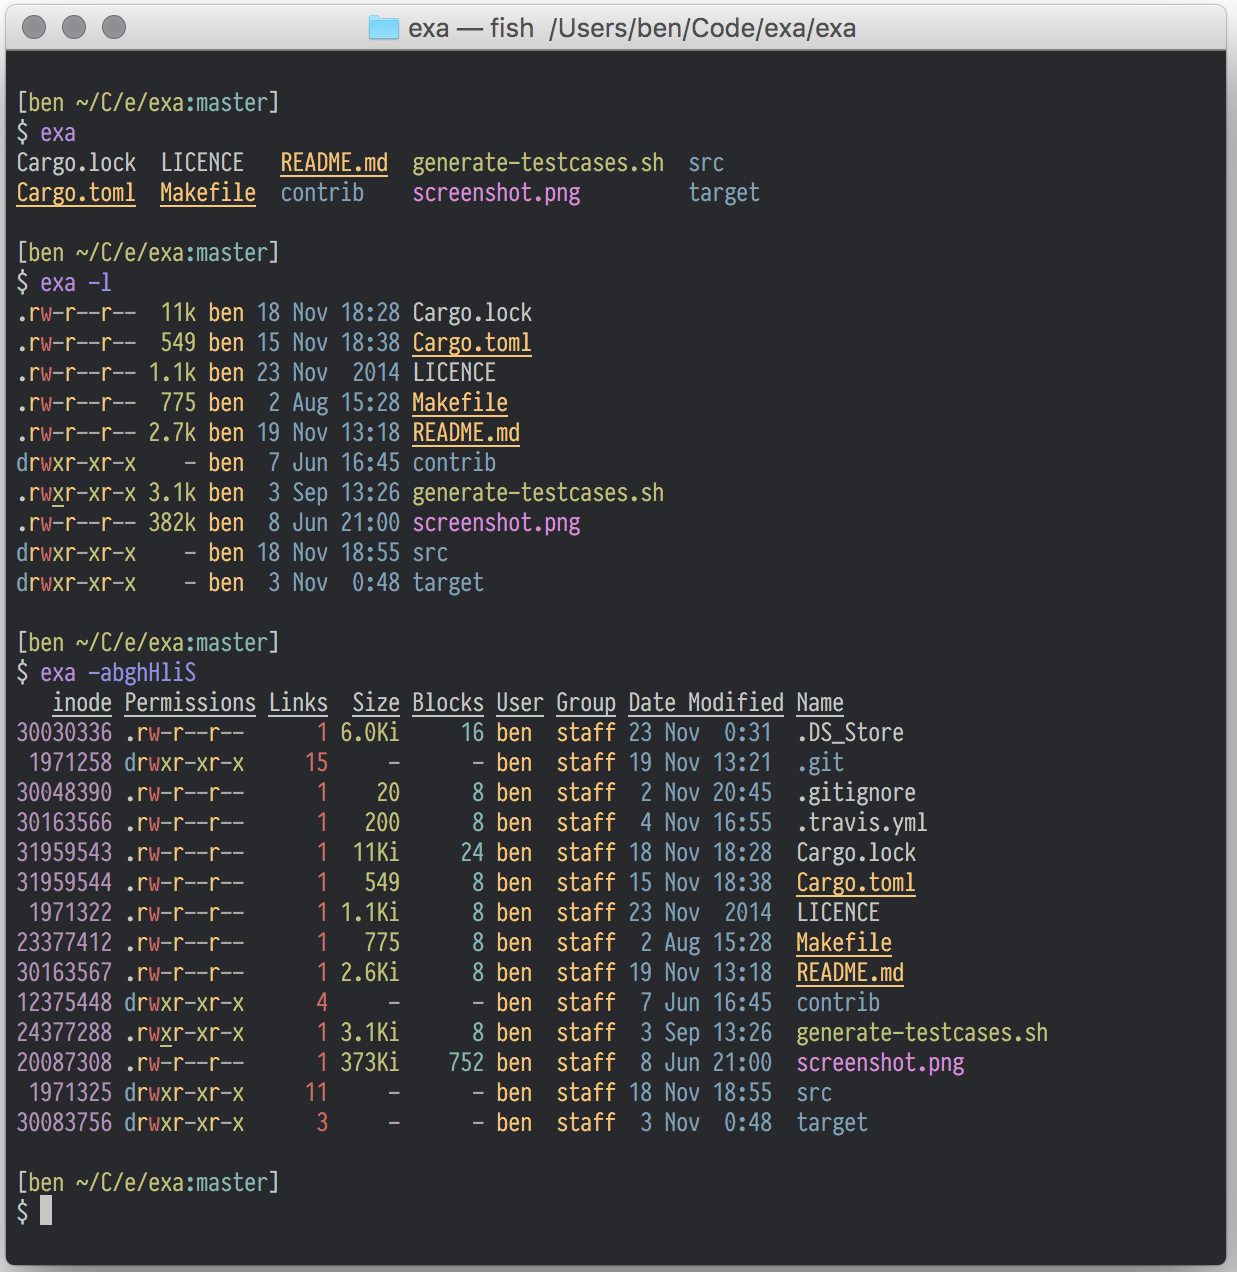
exa is a small and fast alternative for ls. It uses colors to accentuate files & folders, but also file owner, group, permissions, size, date modified, etc...

If you find it a good alternative for ls, you can create an alias, e.g.:
alias l="exa --all --long --color=always --group-directories-first"That’s it! If you like this and have tools to share with us, why not send us a tweet :)
